
A wedding invitation stops being paper the moment a wax seal goes on it. It becomes a small, dimensional object with a spine, a thickness, a center of gravity, and a set of tolerances that behave more like millwork than stationery. Treat it that way from the first sheet and the suite survives the mail. Treat it as printing with decoration glued on afterward, and the postal machinery will tell you exactly where the design went wrong.
In this Article
- What Makes Three Layers Read as One Package
- Paper Weight Sets Every Tolerance Downstream
- Stacking Order, Scored Creases, and Where the Wax Lands
- Thickness, Surcharges, and the Two Test Mailings
- Building the Charcoal-and-Copper Suite, Step by Step
What Makes Three Layers Read as One Package
Sorting a studio shelf of returned and damaged suites produced a cleaner definition than any style guide. The intact pieces had nothing in common on price of paper or complexity of design. What they shared was job allocation: each tactile register carried one assignment and did not borrow from its neighbor.
Three registers run through a cohesive suite. Rough lives at the outer edge, in the feathered deckle of handmade cotton. Translucent lives in the middle, as the vellum wrap that softens and partially conceals the printed card beneath it. Heavy lives at the center, in the wax dome that anchors the whole bundle and gives the recipient a place to put a thumb.
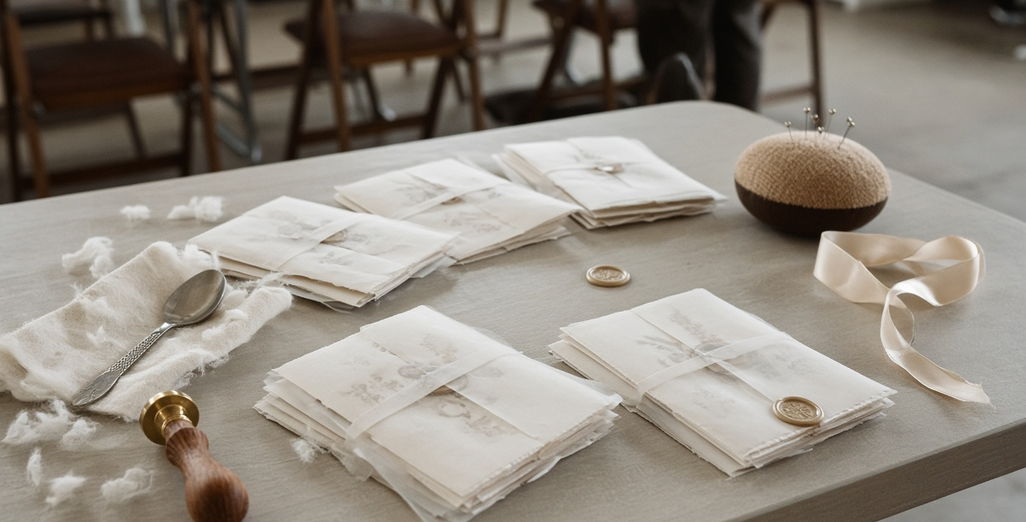
Damaged suites almost always had two registers fighting for the same layer. Heavy foil printing under a frosted wrap, or a deep deckle doubled with a thick ribbon at the same edge, and the hand reads confusion instead of intent.
The dimensions matter here because they predict failure. A three-layer suite built on 300 gsm cotton stock measures roughly 0.09 to 0.11 inches at the spine before the seal is poured. The wax dome adds another 0.12 to 0.18 inches at its center. That center bulge is the precise point where the package stops behaving like flat paper and starts behaving like a parcel.
Deckle Depth Check
Feathered fiber running about 1/8 to 1/4 inch along the edge reads as handmade. Shallower than that and the deckle vanishes entirely under a vellum wrap, wasting the premium paid for the sheet. Deeper and the loose fiber catches and frays during envelope insertion, which shows up as grey lint inside the liner on arrival.
Paper Weight Sets Every Tolerance Downstream
Paper gets specified first because it fixes everything that follows: fold radius, wax adhesion, envelope thickness, postage class. Handmade cotton rag was sampled at roughly 220, 300, and 450 gsm for this build. The 300 gsm sheets won on balance. They hold a visible deckle while still clearing a straight rear-feed path on a desktop inkjet. The 450 gsm sheets had the better edge by a wide margin and jammed on any printer without a true flat paper path, which pushed them out to an outside vendor and off the DIY table.
Printing Method and the 250 gsm Line
Cotton rag at 300 gsm, roughly a 110 lb cover equivalent, feeds reliably through rear-loading inkjets rated to about 0.3 mm media thickness. Laser toner is the problem above 250 gsm: the fusing step sits the toner on top of the fiber rather than bonding into it, and a fingernail will lift printed type off the sheet. Digital flat printing or letterpress is the safer specification for heavy cotton.
Vellum That Folds Instead of Snapping
Translucent vellum in the 100 to 115 gsm band folds cleanly and holds a crease. Lighter sheets bow and wrinkle under a ribbon; heavier sheets resist the fold and spring back off the stack.
Printed vellum carries one non-negotiable schedule item. Pigment ink sits on the surface film rather than absorbing into fiber, so a printed wrap needs 24 to 48 hours of open-air cure before anyone handles it. Stack it early and the pigment ink offsets onto the sheet above, leaving a ghost of the type on the back of the next wrap.
Pigment Ink Cure Time
Build the production schedule backward from the vellum, not the paper. A 48-hour cure window for pigment ink on the wraps has to land before the assembly weekend, or the entire run gets handled wet and the suite that looked crisp on the proofing table arrives smudged.
Wax That Survives a Sorting Belt
Traditional sealing wax cracks. Flexible resin-based formulations melt usable at roughly 150 to 180°F in a dedicated wax melting spoon or a low-temperature glue-gun-style applicator, and they tolerate the flex that a letter takes in transit. Qualify a batch with a bend test: cool a seal fully, flex it over the edge of a desk, and look for a crack line. If one appears on the bench, it will appear in the mail.
Stacking Order, Scored Creases, and Where the Wax Lands
Assembly order was reverse-engineered from the recipient's hand rather than from design logic. Test assemblers were handed finished bundles and watched. Every one of them slid a thumb under the shortest card first. That fixed the architecture: largest and most important card at the back, enclosures cascading forward by size.
Cascade in 1/2 to 3/4 inch increments. A 5x7 main card with a 4x6 details card and a 3.5x5 RSVP lands the stack reveal cleanly inside that range, keeping each printed header visible when the bundle is held upright.
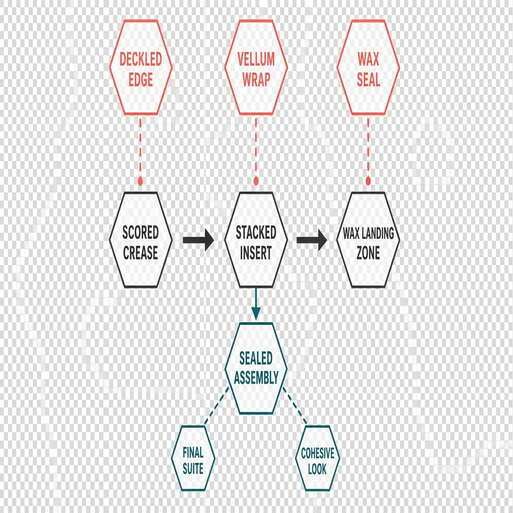
Scoring Vellum Without Cutting It
An unscored vellum wrap cracks white along the fold within a few handlings. Score with a blunt stylus or a scoring wheel against a metal ruler, light pressure, one pass only. Then set the crease with a bone folder working through a scrap sheet so the burnisher never touches the vellum directly. Two passes with a sharp tip cuts the film outright, and the wrap tears along the fold line before the envelope is even sealed.
Giving the Wax Something to Grip
The belly band is structural, not decorative. Run the ribbon or twine at 1/3 height from the bottom edge of the wrap and pour the wax pool centered on the band, with at least 1/4 inch of wax sitting on ribbon rather than vellum on all sides. The wax then bonds to the band and the band carries the load. Pour directly onto bare vellum and the seal either peels off in transit or fuses through to the printed card beneath it, which ruins both layers at once.
Thickness, Surcharges, and the Two Test Mailings
The prototype-first rule came out of a specific weekend. One hundred twenty suites were assembled, sealed, and only then weighed. The finished package landed just over the thickness line, which meant every envelope needed a second trip to the counter for surcharge postage after the seals had already set and the bundles could no longer be flattened.
A letter-size envelope stops being machinable once it exceeds roughly 1/4 inch in thickness, becomes rigid, or carries uneven lumps. A wax seal plus wire or ribbon triggers all three conditions simultaneously, which moves the piece into a non-machinable category with a surcharge on top of the weight-based rate. The USPS physical standards for non-machinable letters set out the measurements the counter clerk is working from.
A fully assembled suite in a lined outer envelope commonly weighs 1.6 to 2.4 oz. Take the sealed prototype to a retail counter and have it weighed and measured there rather than estimating from a kitchen scale, because the thickness determination matters as much as the weight.
Then mail two copies: one back to the assembler, one to the furthest-away person in the wedding party. Send them 10 to 14 days before the production mailing date. Domestic transit on the long-haul test typically runs 3 to 7 days, which leaves room to switch wax formulation or drop to a flatter seal if either copy arrives cracked.
Hand-Cancel Reality
Hand-canceling is a retail-counter courtesy rather than a guaranteed service. Staffed post offices will usually accept a tray of pre-stamped suites when they are brought in off-peak and the clerk is asked directly. Contract postal units inside pharmacies and grocery stores generally route everything straight to the automated plant, and a large batch may need splitting across two visits.
Building the Charcoal-and-Copper Suite, Step by Step
This blueprint was built three times, and the failures set the numbers. The vellum score started at a flat 5.0 inches to match the card width, and the wrap buckled across the front because it had no room for the stack's own thickness. Moving the score to 5.1 inches supplied the tenth of an inch of slack that lets the wrap sit flush. Copper wire gauge was settled by what the wax could sit on without rocking.
Materials: charcoal-grey 300 gsm cotton main card at 5x7 inches, stark white RSVP at 3.5x5 inches, frosted translucent vellum cut to 10.3 x 7.25 inches, 24-gauge dead-soft raw copper wire, matte black flexible resin wax, brass botanical stamp.
- Print and stack. Print the charcoal main card and the stark white RSVP, let both rest, then set the 5x7 at the back with the RSVP cascaded forward so its printed header clears the main card's lower edge.
- Score the wrap at 5.1 inches. Measure 5.1 inches from the leading edge of the 10.3 x 7.25 inch vellum sheet and score once with a blunt stylus against a metal ruler. Set the crease with a bone folder through a scrap sheet.
- Fold over the stack. Wrap the scored vellum around the cascaded cards. The extra tenth of an inch absorbs the combined card thickness, and the front panel lies flat instead of bowing.
- Bind with copper. Wrap 24-gauge dead-soft raw copper wire twice around the bundle, twist three to four turns at center, then flatten the twist with flat-nose pliers until it sits under 1/16 inch proud of the wrap.
- Pour the seal. Lay a matte black wax pool about 1 inch across directly over the flattened twist. Stamp with a chilled brass botanical seal and hold for 30 seconds before lifting.
- Rest before stacking. Let each finished seal sit 20 to 30 minutes before suites are stacked or inserted into envelopes.
- Chill the brass between pours. Set the stamp face on a cold metal plate, or dip and dry it, after each impression. Somewhere around 8 to 12 consecutive seals the brass retains enough heat to stick, and the impression loses its edge detail.
Watch the twist above all else. Once that copper stands more than 1/16 inch proud of the vellum, the brass bites deep on one side of the pool and shallow on the other, and adding wax only enlarges a lopsided impression. Flatten first, pour second, and the botanical stamp reads evenly across all 120 pieces.









Write a Comment