Addressing Envelopes: Calligraphy Hacks for Beginners
You Don't Need Good Handwriting
I have a confession to make: My everyday handwriting? It’s basically chicken scratch. But when I sit down to address an envelope, people ask me who I hired to do it.
The secret isn't 10,000 hours of practice with a dip pen (though that helps!). The secret is having the right cheats. If you want that high-end, hand-lettered look for your invitations without paying a professional $3.00 per envelope, you can absolutely DIY it. You just need patience, a good playlist, and a few tricks up your sleeve.
Hack #1: The Light Box Method (The Ultimate Cheat)
This is the holy grail for beginners. If you are using light-colored envelopes (white, cream, or pale grey), you don't need to freehand anything.
- Step 1: Type out your guest list in a beautiful script font on your computer.
- Step 2: Print them out on standard printer paper.
- Step 3: Place the printed sheet inside the envelope.
- Step 4: Place the envelope on a "Light Pad" (you can get thin LED ones online for cheap). The light shines through, and you simply trace the letters!
It ensures perfectly centered, straight lines every time. Once you finish the front, don't forget the back flap! You can save time there by using the custom stamp technique I teach in Wedding Invitation Stamps.
Hack #2: Faux Calligraphy
"But Sophie," you say, "I'm using black envelopes for my industrial theme! I can't see through them!" No problem. Grab a white Gelly Roll pen and learn Faux Calligraphy.
Real calligraphy relies on pressure (pushing down for thick lines, lifting up for thin lines). Faux calligraphy mimics this with a standard monoline pen.
Write the name in cursive.
Go back and draw a second line next to every downstroke (any time your pen moved down the paper).
Color in the gap.
Suddenly, your simple cursive looks like professional brush lettering. It’s magic.
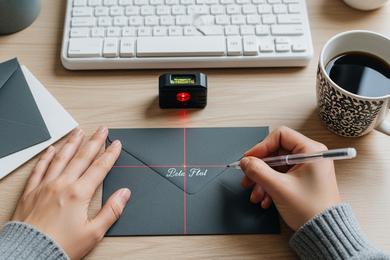
Hack #3: The Laser Level
Nothing ruins an envelope faster than a name that slants downhill. If you are freehanding on opaque paper, you need a guide.
Pencil lines are great, but erasing them afterwards can smudge your ink. Instead, I use a small Laser Level (yes, from the hardware store!). It projects a beam of light across the envelope giving you a perfect baseline to write on. When you move the envelope, the line is gone—no erasing required.
This is especially helpful if you are using metallic inks, which can be tricky to erase over. Speaking of metals, if you're trying to decide between gold or copper ink, check out Emily's guide on Metallic Color Palettes to match your stationery to your venue.
Frequently Asked Questions
For black ink, the Tombow Fudenosuke (Hard Tip) is unbeatable. It’s firm enough to control but flexible enough to get line variation. For white ink, the Sakura Gelly Roll 10 is the industry standard—it flows smoothly and is truly opaque.
Buy 20% extra envelopes. Seriously. You will mess up "Massachusetts" at least once. Having a buffer stack stops you from panicking when you smudge a zip code.
Yes. Formal etiquette dictates no abbreviations. "St." becomes "Street," "Apt" becomes "Apartment," and "IL" becomes "Illinois." It creates a cleaner, more elegant block of text.
About the Author